
God of War - Case Study
Recreate the GoW Level 'Escape the Ruins'
Case Study Introduction
When playing God of War I was really impressed by the quality of Santa Monica Studio's level design. I wanted to understand what made these levels so engaging and fun to play. To answer that question I decided to reconstruct a level from God of War, 'Escape the Ruins'. This is a short contained level that demonstrated a number of level design principles I wanted to explore more of in my own work. Below I outline the process of recreating the level, along with my learnings from the experience. This greybox level is made through a combination of Maya and Unity.

Building the Level
To recreate the level I started by building a character controller and 3rd person camera in Unity, which needed to have a similar look and feel to the one used in God of War, matching Kratos' position and size in the Camera's Frame. I started looking at reference images and replaying the level multiple times to better understand it's layout and scale, from there I began roughly modelling the level in Maya, then I imported the greybox to Unity, where using the character I could check if the scale and dimensions I was using looked corrected when compared to my references. Once the overall shape of the level was complete, I needed to do a pass to add the most important elements of the level that would be included in the greybox, these included fire, chests, the wooden bridges, red placeholder enemies and gold markings. When the level was fully built I was able to study it, breaking down the levels structure, encounters and flow to gain a better understanding of the level design principles employed by Santa Monica Studios.
Greybox Walkthrough
Level Structure and Encounter Design
-
The Level starts with Kratos and Artreus falling through a bridge they needed to cross and dropping into the Ruins below
-
To Escape the Ruins and return to the bridge above, the player will need to find there way up through the various floors of the Ruins
-
The Escape the Ruins level can be broken up into 5 areas, the players start in the lowest area and must reach the highest
-
Below is a map showing the path through the level and the heights of the 5 different areas, level 01 is the lowest and 05 the highest
-
The Level provides a nice variety of encounter types and different enemies to achieve a level that flows with excellent pacing throughout
-
Below I quickly outline the encounters of each of the 5 areas, it is interesting to note how Area 03, the middle area, provides bridge and chests puzzles to reward exploration and provide a break from the combat encounters found throughout the other areas of the level:
-
Area 01 - Large arena style combat, Enemy Type: Draugr, Melee units and elevated ranged units on back wall
-
Area 02 - Introduction of Revenant, New Ranged Enemy with strong line attack and evasion, narrow area to fight compliments line attack
-
Area 03 - Bridge Puzzles and Rune Chest Puzzle in open area to reward and encourages player exploration
-
Area 04 - Father and Son Story Beat with combat against different Enemy Faction, The Reavers introduced in Ambush Encounter
-
Area 05 - Reach the Bridge, Introduction to Brock, followed by a short combat against Draugr to test out new upgraded Axe
-

Level Design Principles learned through reconstruction
Clear progression through the use of Landmarks and Verticality
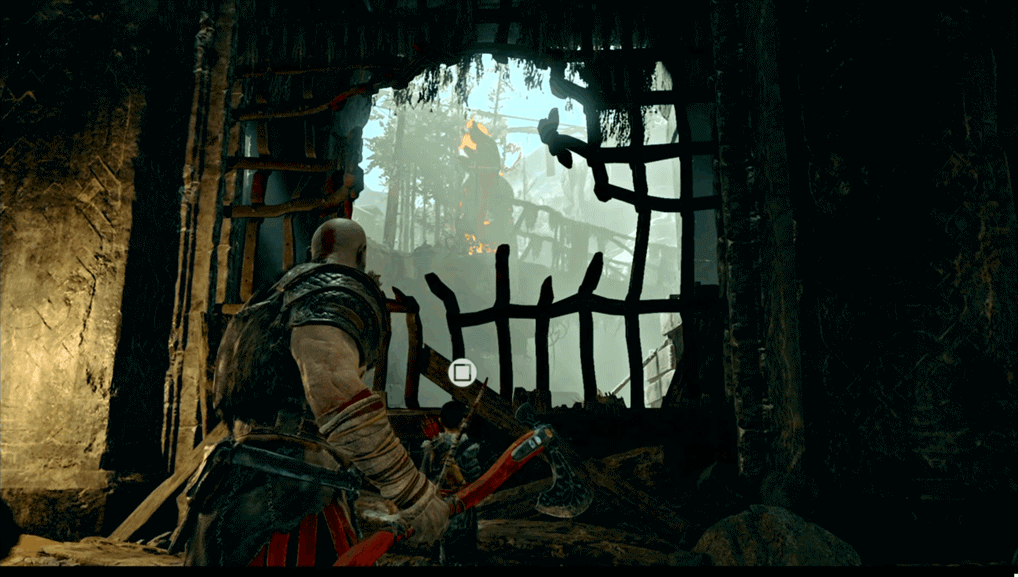
The level starts with the Player falling through a bridge they needed to cross and dropping into the lowest part of the Ruins. From there they look back up at the bridge, they are met with the sight of a two flaming bridge posts, the posts are tall and iconic, detailed with flaming heads that draw the players eye. The Flaming Posts and their height above the player become a strong landmark for the levels progression, they are hidden then revealed to the player at various points throughout the level. Each time the posts are revealed the player is higher up in the level and the posts become closer, marking the players progression to the end of the level. Using a landmark to set goals and to create a clear progression through levels is design tool seen in many games like 'The Last of Us' for example, but it is also a principal I am familiar with when I worked as an Architect. People inside or outside games uses landmarks to orientated themselves in a space and it is a very effective way of helping the player know where they are and guiding them, so they have a clear direction of where they are going. Below I show images from the level, marking whenever the view of the Flaming Bridge Posts was revealed after being hidden from the player's view, the reveal happens 3 times before reaching the end of the level, note that each time the posts are revealed the player is closer to the landmark in both height and distance, also notice the excellent use of framing and composition in View 02.
View 01 - Seeing the Flaming Bridge Posts for the first time in Area 01


View 02 - After passing through the indoor Area 02 of the Ruins the Landmark is revealed
View 03 - After indoor Area 04, the final reveal happens and you reach the bridge


Using Fire as way to signpost rewards and encourage exploration
Fire and light is used to great effect in this level to draw the players eye and highlight possible areas to explore. This can seen best in area 02, after leaving area 01 the player moves from an outdoor to the indoor part of the Ruins. This shift to an indoor environment means that lighting can be used to great effect to guide the player through the level. It is interesting to note how fire was used in combination with chests to reward player exploration, this means the player's eye is drawn to the movement and contrast of the fire but once looking in that direction they see the chest or reward the fire is highlighting. From there the player asks themselves 'Oh - How do I get up there?'. This simple use of light and chest placement is a great way to encourage exploration through a level. Below shows the various ways the level designers used fire in Area 02 to highlight chests to encourage player exploration.
Fire Signposting 01 - Hinting a hidden area behind a breakable timber planks


Fire Signposting 02 - Encouraging exploration by highlight chests in difficult to reach areas

Fire Signposting 03 - Fire can also be used to frame an important interactive object


Affordances as a way of marking what can be interacted with in the Environment
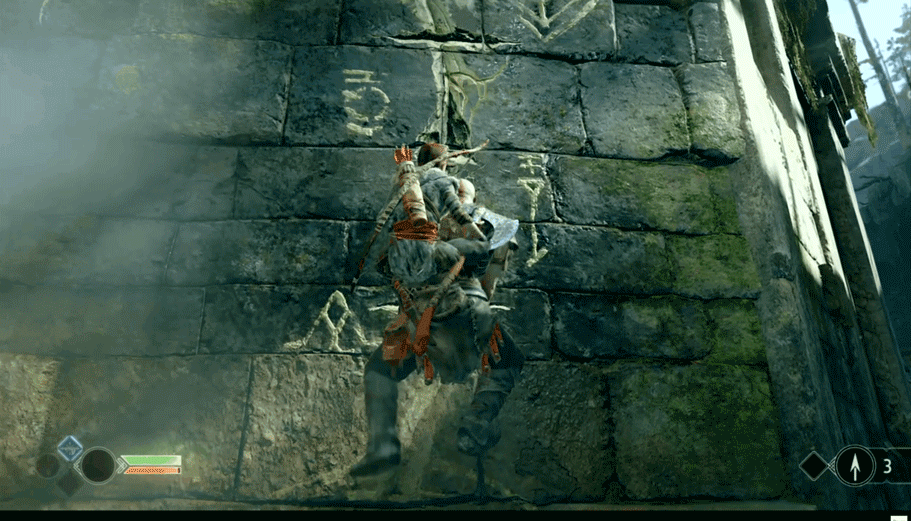
God of War makes great use of affordances in their level design and 'Escape the Ruin' is no exception. An affordance is a visual marker, usually with its own identifying colour, which shows which elements in an environment are interactive, in God of War, interactive objects are in most case marked with Gold Runes or Symbols and depending on how these symbols are carved they can indicate different ways to interact with the environment. If these symbols are used enough in repetition they become rules of how the game works in the player's mind, meaning they can make read their surroundings faster to make more meaningful gameplay decisions and because of that Affordance's become a powerful level design tool. Area 01, in 'Escape from the Ruins' is a great example of how God of War makes use of the same Golden Marking Affordance in two ways to indicate different ways for the player to interact with their environment, below shows images of these examples.
Affordance 01 - Writing on obelisk showing it can be read by Atreus


Affordance 02 - Gold markings showing the line in the rock you can climb along

Affordance 03 - The gold marking can also highlight chains and key axe puzzle elements


Learning Outcomes
Lessons learned through reconstructing and studying the level 'Escape The Ruins'
From reconstructing 'Escape The Ruins', I learned a great deal about the level design principles employed by Santa Monica Studios and also how they apply and implement those concepts in their levels to achieve an excellent gameplay experience. After I had finished this Case Study, I was able to take these some of these Level Design Principles such as Using Landmark, Signposting with fire, Using a Variation in Enemy Types and use them in my own level design, if you are interested in how I applied these principles, I would recommend looking at my other project, 'Journey To The Bridge'.
Overall this study was a really valuable experience to me and I think as level designers, we can learn and improve our skills by interrogating, deconstructing and reconstructing the levels that we love to play.